Darkest Dungeon
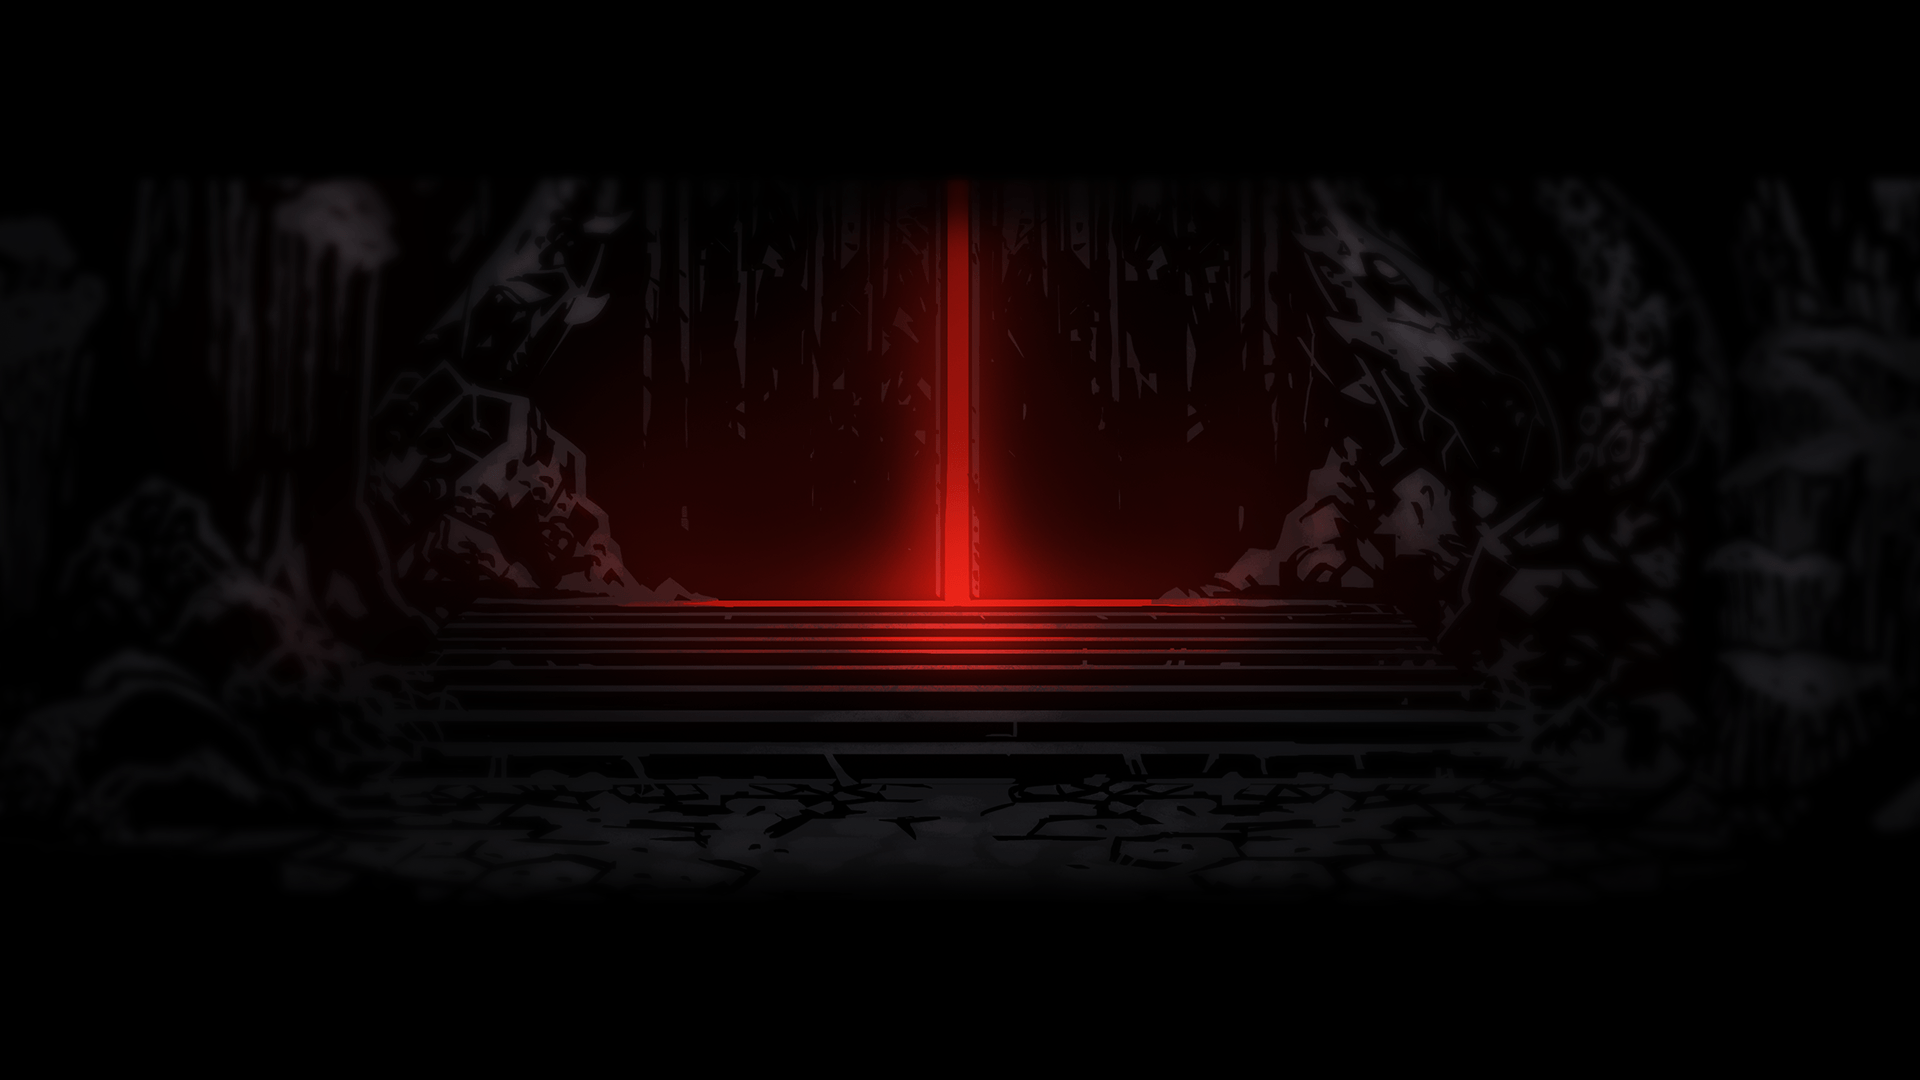
The Darkest Dungeon is a hellish pit filled with eldritch horrors, and those who worship them, that goes all the way down into the Heart of the World itself. To beat the game, you need to complete 4 quests in this location. The music that plays during combat in the Darkest Dungeon is The Final Combat.
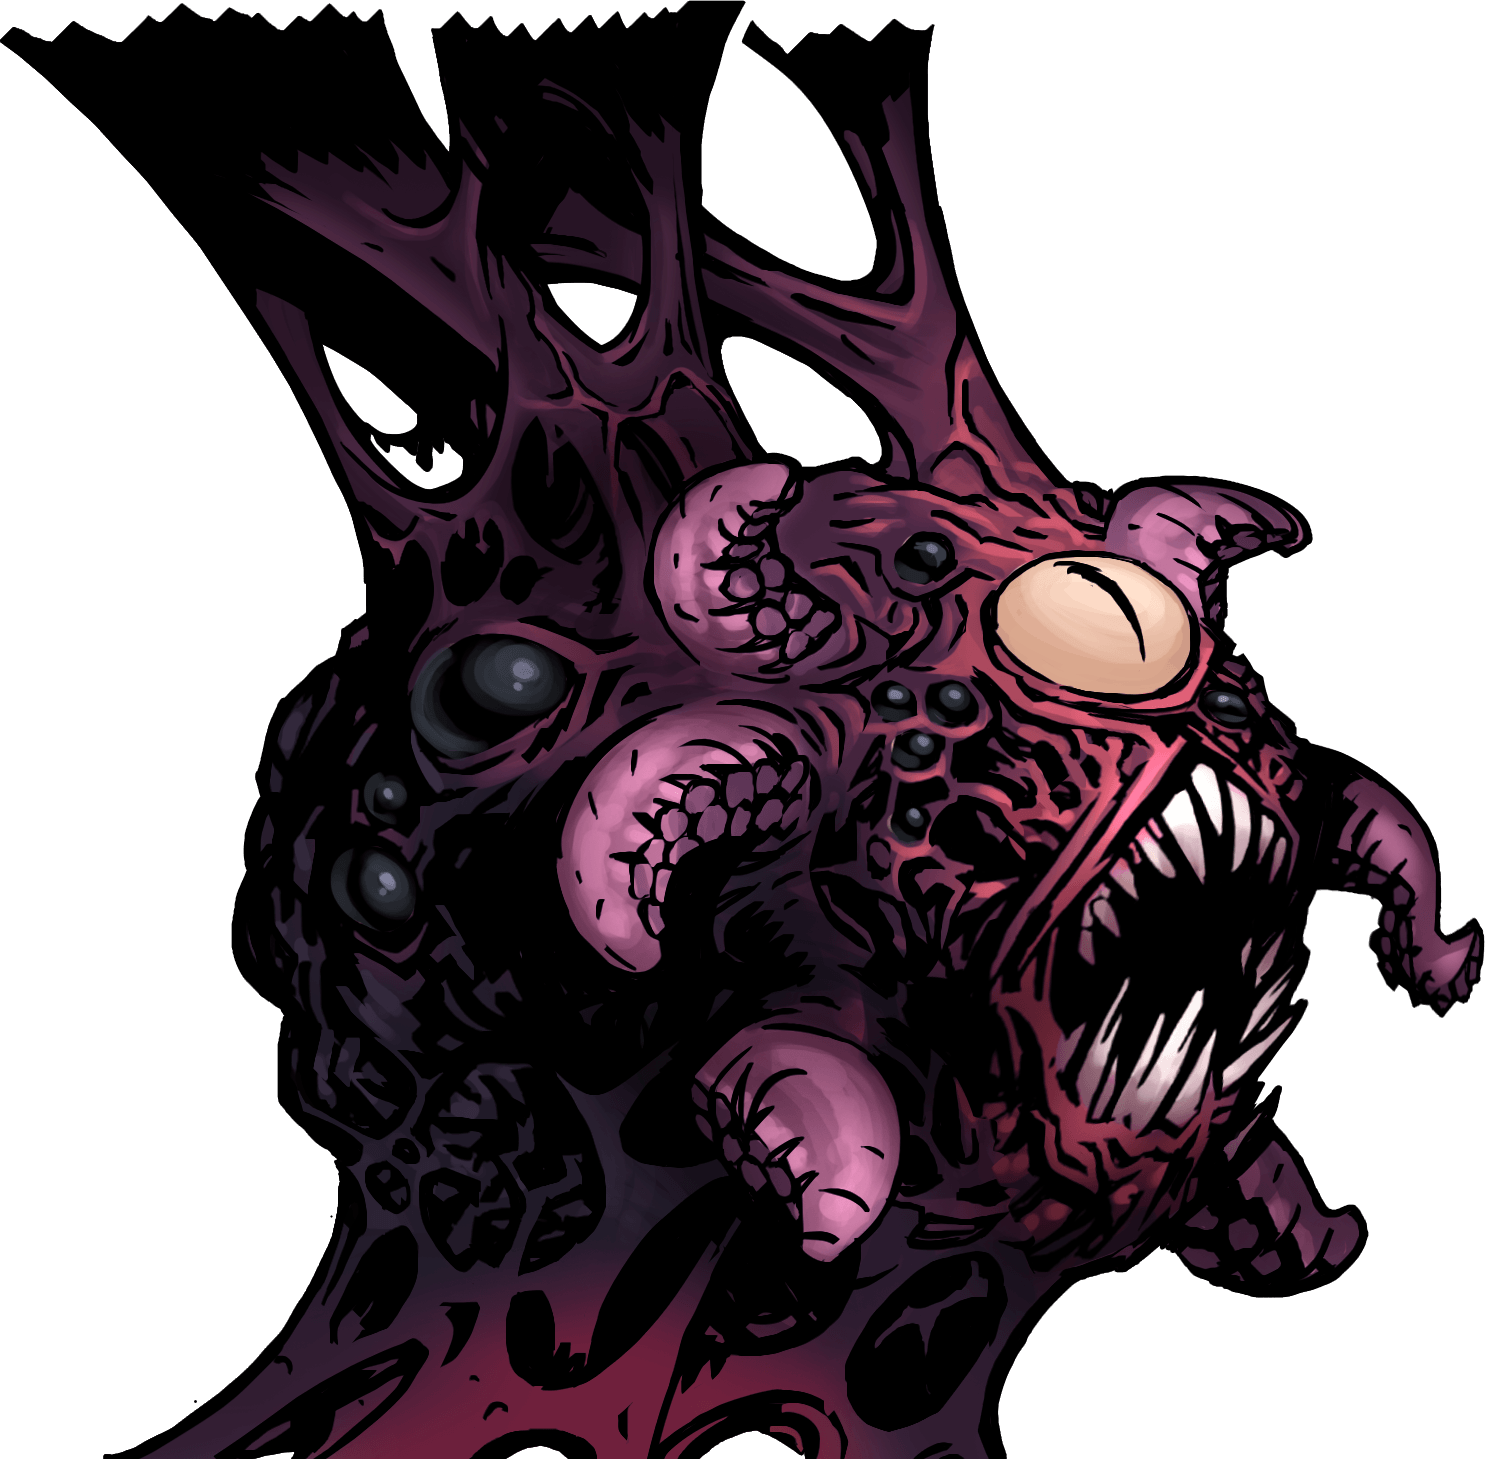
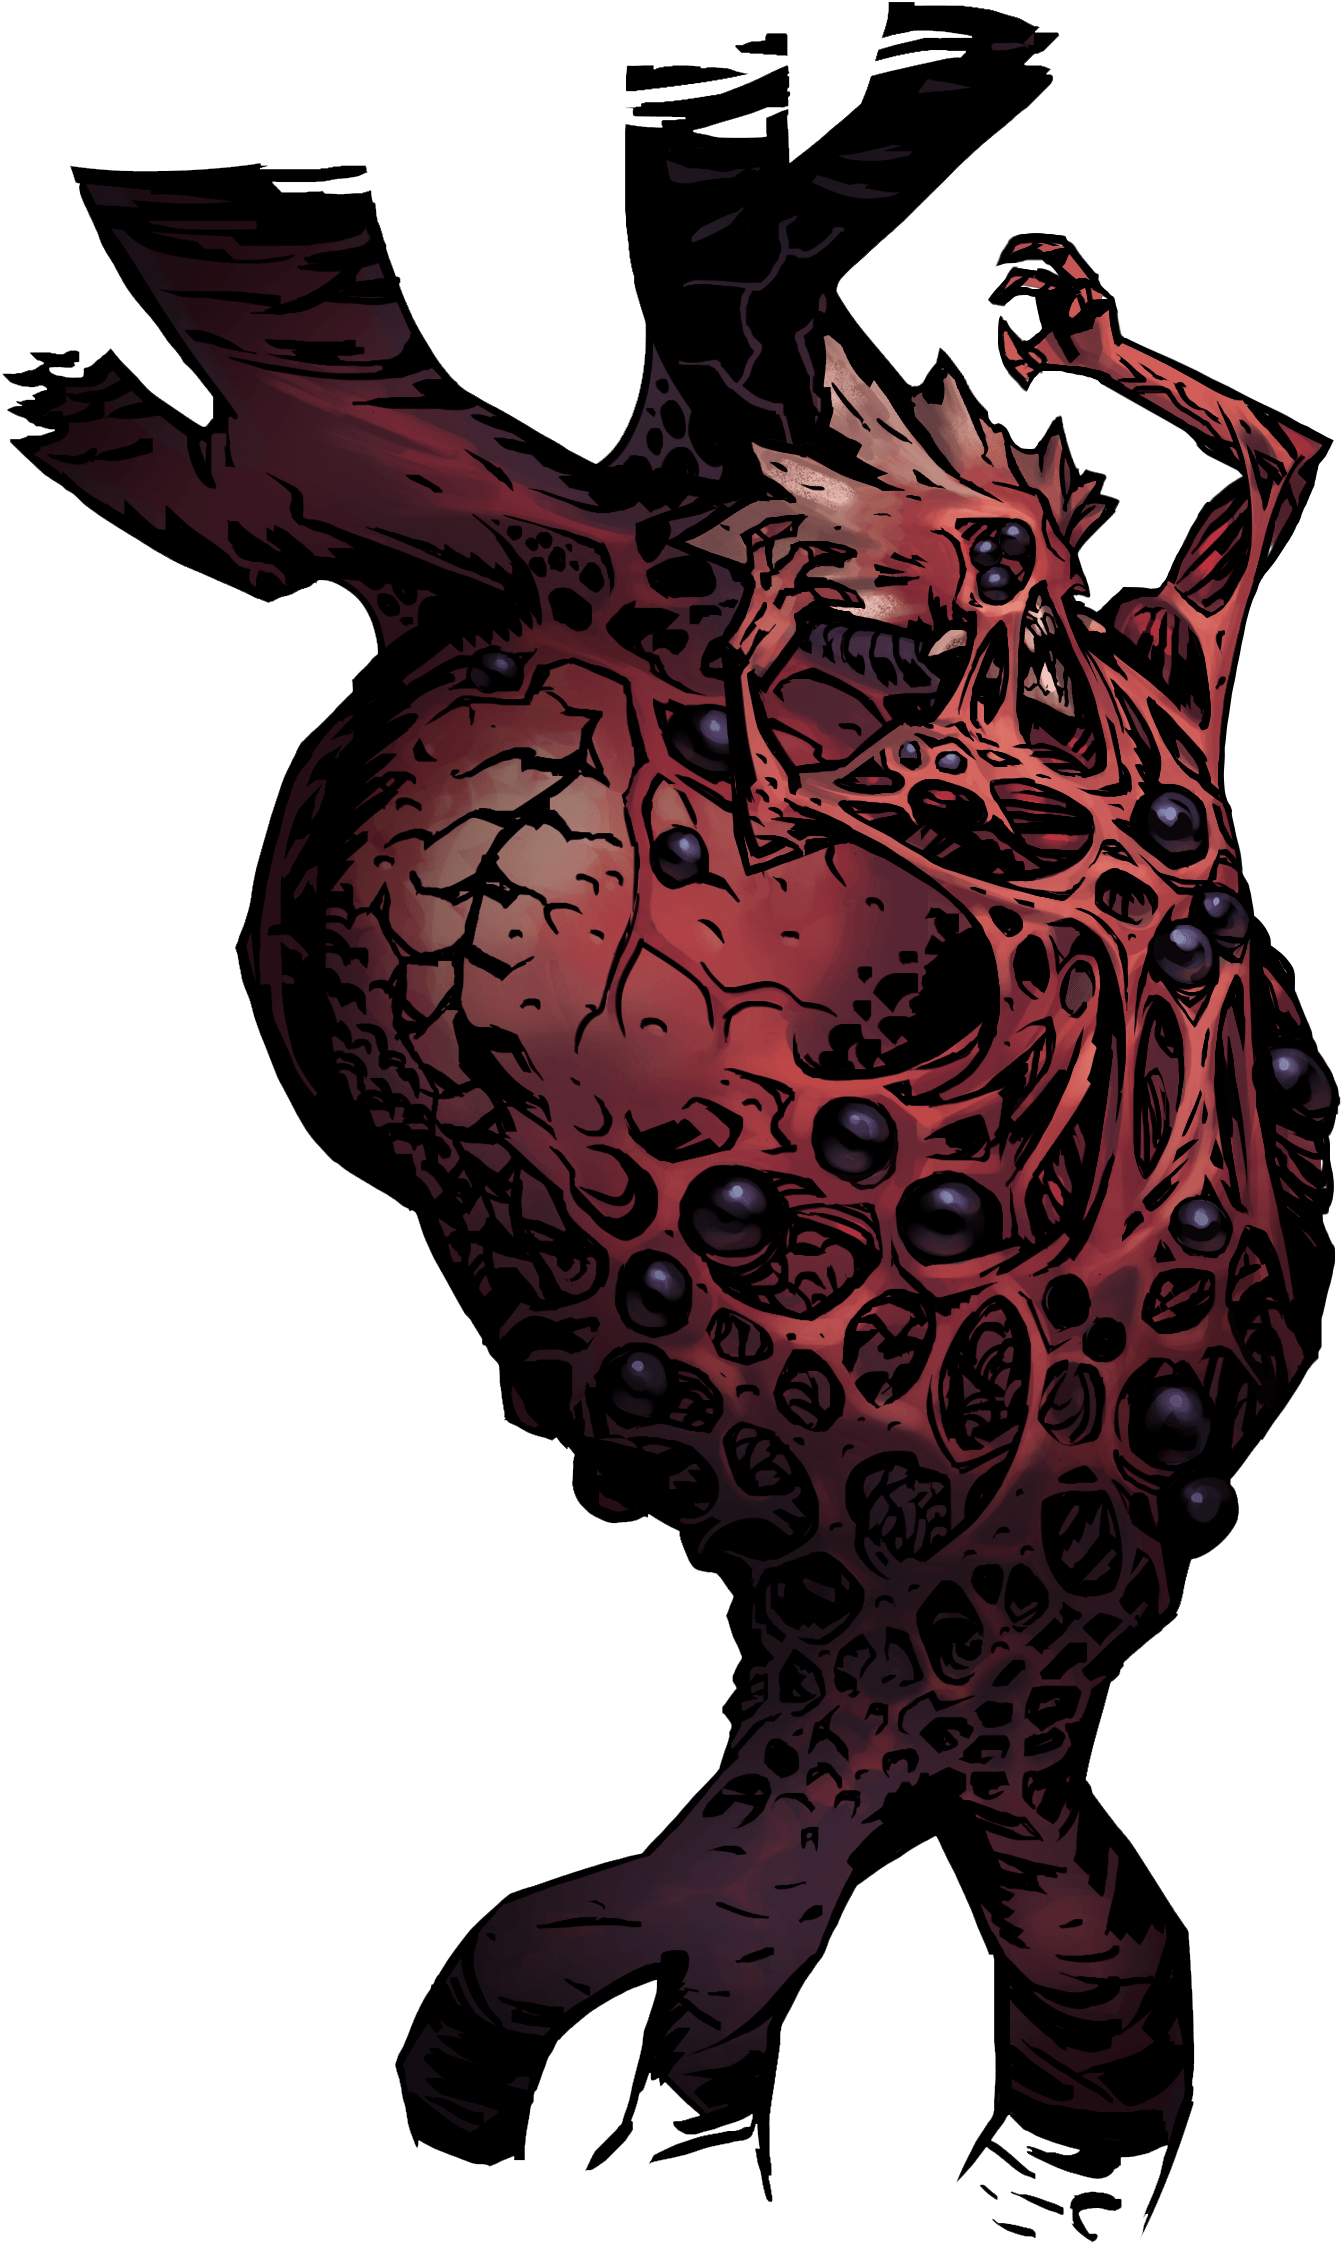
Bosses
Recommended comps
Curios in this location
.png)
.png)

.png)
Trinkets farmed here All trinkets →
Darkest features
First and foremost — the Darkest Dungeon is nothing like the challenges you’ve faced before. Almost every attack will induce stress, every blight and bleed deals high damage, and every encounter has a good chance to be the last.
You can't easily retreat from the Darkest Dungeon, either, should things go south: when you retreat, a random party member will die (representing them holding off the monsters to buy their comrades time to escape). If you're retreating with a lone survivor, that party member will be able to return to the Hamlet safely. If you must flee, unequip all Trinkets before abandoning the quest to avoid losing them. You should also be aware that you cannot retreat at all during the game's final quest.
Characters who successfully complete a quest in the Darkest Dungeon will — on Darkest / Stygian difficulty — refuse to go back ever again. Such Heroes are marked by a torch in a Hero roster and candles on their stat page. However, even though they cannot be used in the Darkest Dungeon again, they can still be a major asset to you: it's still possible to send them on other quests, and they grant additional resolve XP to all other party members from then on. Additionally, Marked Heroes will not count towards your roster capacity, meaning you can recruit 4 more without dismissing anyone or having anyone die.
On Radiant difficulty, Heroes can be reused for subsequent expeditions into the Darkest Dungeon, but at a very high cost — they will immediately enter with 80 Stress, and their Virtue chance will be reduced to the bare minimum of 1%. All these penalties mean that, regardless of difficulty, every Hero will most likely go on a mission only once, so choose your composition wisely.
Unlike the usual random dungeons, the Dungeon Map layout and all fights in the Darkest Dungeon are fixed. You can't see the entire map as usual; rooms will be scouted as you move forward. Scouting doesn't work as usual, either: you don't get to see where the fights are. Hallways also come in different sizes and shapes, from long and straight to short and twisted. Additionally, the rules for reinforcements are always in effect, even if you have them turned off. On the plus side, there are no traps, blockages, or Night-Time Ambushes — meaning that you don't need to waste funds and camping Respite on shovels, keys and skills that Scout or negate ambushes. Shieldbreaker Nightmares also will not occur. Hunger checks also occur more rarely than normal (although they can still happen), so you can reserve more food for emergency healing purposes. Choose provisions and trinkets appropriately.
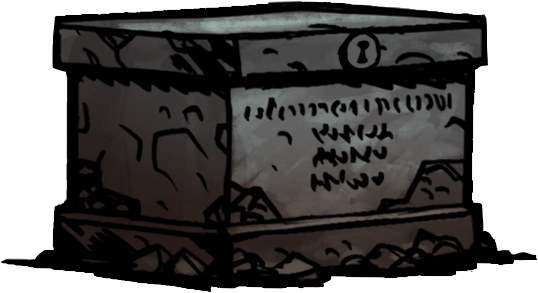
In the Darkest Dungeon, there is very little loot to be found. None of the encounters will yield any loot, barring a victory against the Shuffling Horror which can yield a Shambler's Ancestral trinket. Each of the first three quests will only have a single room containing an unlocked chest with loot - these chests are guaranteed to hold a non-Shambler's Ancestral trinket; having the full collection will just have the chest contain random treasures. The only way to turn in a profit is by completing the quest and collecting the victory rewards.
If you fail or abort a quest in the Darkest Dungeon with at least one hero at Resolve Level 5 or 6, it will only strengthen the resolve of those left behind, giving a x2 Resolve XP Bonus in the next quest. If you succeed, all your Heroes in the Hamlet, including those returning from the successful quest, are inspired, and have all their stress removed.
After you complete the first quest in the Darkest Dungeon, the player character will begin to see things differently. Whenever you take an action in town (such as buying upgrades at the survivalist or purchasing provisions before setting out), select a region to quest in, or reassign a hero's skills, there is a chance that the screen will flicker and show you something... unexpected.
Provisions
- Shovels and keys are useless: there are no curios that need a skeleton key, and there will be no obstacles that need to be cleared out.
- Antivenom and bandages are far more useful than usual, due to the high bleed and blight damage.
- Buying enough food and torches is also very important, as these quests tend to be exhausting.
- Bringing Holy Water to increase a Hero's resistances in certain fights is a good idea.
- Laudanum is useless, since enemies do not inflict horror.
In general, it is better to buy as many items as will fit in your inventory - normal fights and rooms produce no loot. There is no point being stingy when going into the most difficult dungeon in the game, and it is impossible to arrive over-prepared.
Quests and strategy
We Are The Flame
- Size: Medium
- Difficulty: Darkest
- Goals: Kill 1 Shuffling Horror
Your main threats on this quest will be high stress damage and heavy bleed attacks. Pack bandages, and bring at least one hero who can heal stress damage (such as the Jester, Crusader, or Houndmaster). There are no enemies here with blight attacks, so you can safely leave the antivenoms behind.
The map layout is more or less mirrored throughout — just keep walking to the right on the map and you'll eventually find the Shuffling Horror. It's impossible to get lost or walk into the wrong room. The first few battles will give you a general idea of what you will face. Again: expect heavy stress and bleed — come prepared to manage them, and try to end fights as quickly as you can.
The Rapturous Cultists are harmless on their own, and if they're the last enemies remaining, you can use the opportunity to heal your party. Do not overstay your welcome, though, since the Rapturous Cultists can summon reinforcements if you drag the fight too long.
The Shuffling Horror is a stronger version of the Shambler, and can summon enemies like the Cultist Priest and Defensive Growth to assist him. In addition to hard-hitting bleed attacks, his attacks will shuffle your party around — bring Heroes that are effective from multiple positions. With 2 actions per turn, debuffs are less effective: keep the other enemies stunned, and focus on killing the Horror as quickly as you can. A party of 2-3 characters with riposte skills can make quick work of the Shuffling Horror as its attacks target the entire party and it will as such smack itself to death while attacking you.
You're not completely in the clear if you've slain the Shuffling Horror. You must still kill off any stragglers to end the fight. If you did kill the Shuffling Horror but died to the leftover enemies, the quest still counts as completed and you can proceed to the next mission.
Recommended classes: Abomination, Bounty Hunter, Crusader, Grave Robber, Hellion, Highwayman, Jester, Man-at-Arms, Occultist, ShieldbreakerShieldbreaker.
| DD1 Map layout with enemies and curios (spoilers) |
|---|
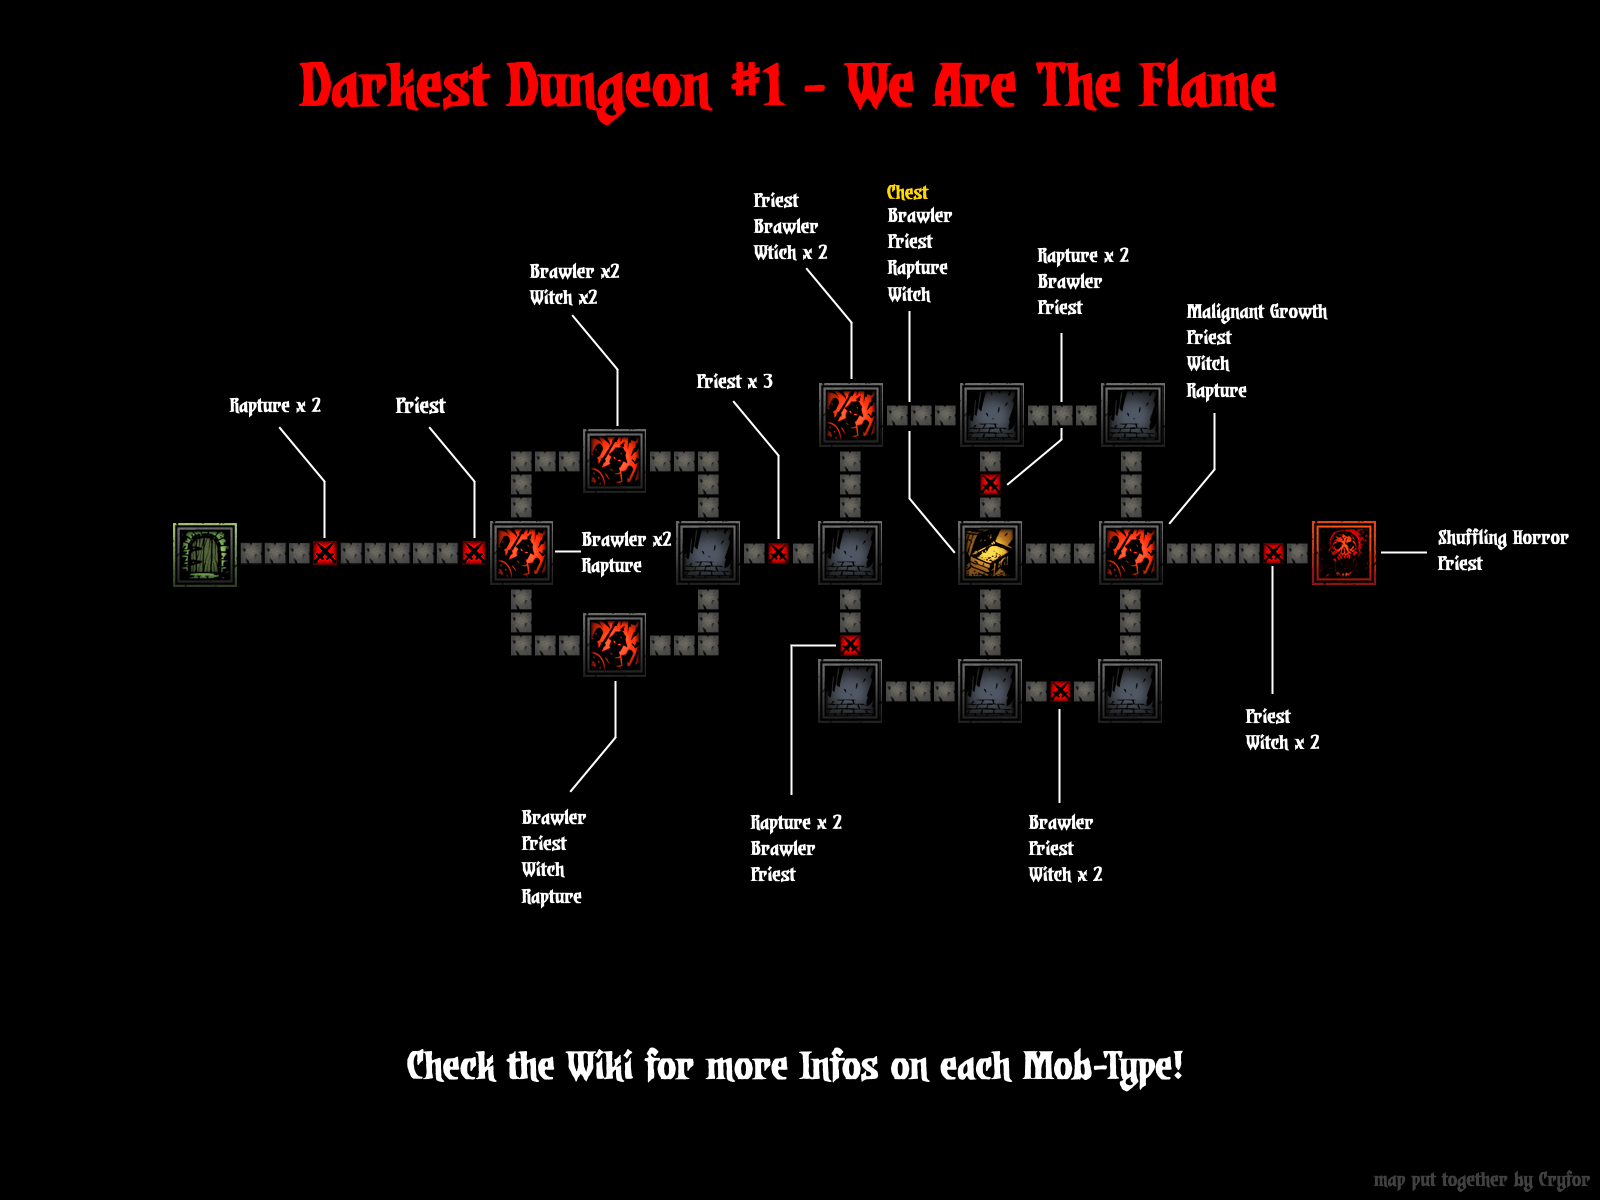 |
Lighting the Way
- Size: Long
- Difficulty: Darkest
- Goals: Activate 3 Iron Crowns
This is arguably the hardest quest in the game: you can expect bleed, blight, and debuffs, and the three altars that you need to activate are guarded by minibosses: the Templar Impaler and the Templar Warlord.
The Templars are not only tough and hard-hitting, with two actions per turn, but their Revelation attack, which they'll always use one of their two actions on, hits like a truck. You can, however, use the Talismans of the Flame you got from the previous quest to negate the health and stress damage from Revelation. The catch is that there are only three Talismans, so one of the Heroes has to go unprotected. As such, you're probably going to want to bring someone with a guard ability — like the Man-at-Arms or Houndmaster — to protect whoever doesn't have a Talisman. The Man-at-Arms is generally preferred due to the strength of his party buffs that lets the party better weather Stress-inducing attacks across the rest of the level. Take note that, due to the game mechanics capping Stress resistance at -80%, the Talisman doesn't fully negate the Stress damage from Revelation — you'll still take about 8 Stress each time, so bring along a Stress healer because your guarding hero will be exposed to a lot of Stress. Your heroes equipped with Talismans can only access one other Trinket, so choose your equipment carefully.
The altars are located in the dead ends at the end of each passage available from the starting room. Return to the starting room after activating each altar by backtracking through the same rooms to avoid unnecessary fights and to minimize Torch drainage.
The altar to the right has both an Impaler and a Warlord, so it is advised to do it either first (when your party is fresh) or last (saving the toughest fight for last). The other two rooms feature one of the Templar types, and 2 other enemies as support: the room on the left features a Templar Impaler with 2 Polyp companions, and top room a Templar Warlord and 2 Flesh Hound companions. Even though these fights only feature one Templar type, you should not ignore the Flesh Hounds and Polyps since they can shuffle your heroes around and they use those abilities often. Take out those enemies first before you take on the Templar, as he will not resummon them.
With two campfires for three miniboss fights, it's important to plan a proper route to minimize battles, so that your camp buffs can last between two Templar fights. Between the left and right altars, there's just enough combat when moving from one to the other that you can engage the second altar fight just before the camp buff expires, leaving you free to save the firewood for the final altar. In between, just as with the first mission, you can take advantage of any fights with two Rapturous Cultists in order to fully heal your party.
Warning: Do not forget to activate the altars before leaving! If you leave the room without activating it, a bug will prevent you from interacting with the altars again — preventing you from beating the quest, and forcing you to lose a hero in retreat. (As of 12/23/2017, it seems at least the northern altar can be returned to successfully interact with the altar.)
Recommended classes: Abomination, Arbalest, Bounty Hunter, FlagellantCrimson Court(if applicable), Highwayman, Houndmaster, Jester, Man-at-Arms, Occultist, Vestal.
Note: The battle against a Malignant Growth, a Priest and a Rapturous Cultist in one of the bottom right corridors is in actuality one square further from the starting room, and the battle against a pair of Priests and a pair of Rapturous Cultists is two squares further, just before the empty room.
| DD2 Map layout with enemies and curios (spoilers) |
|---|
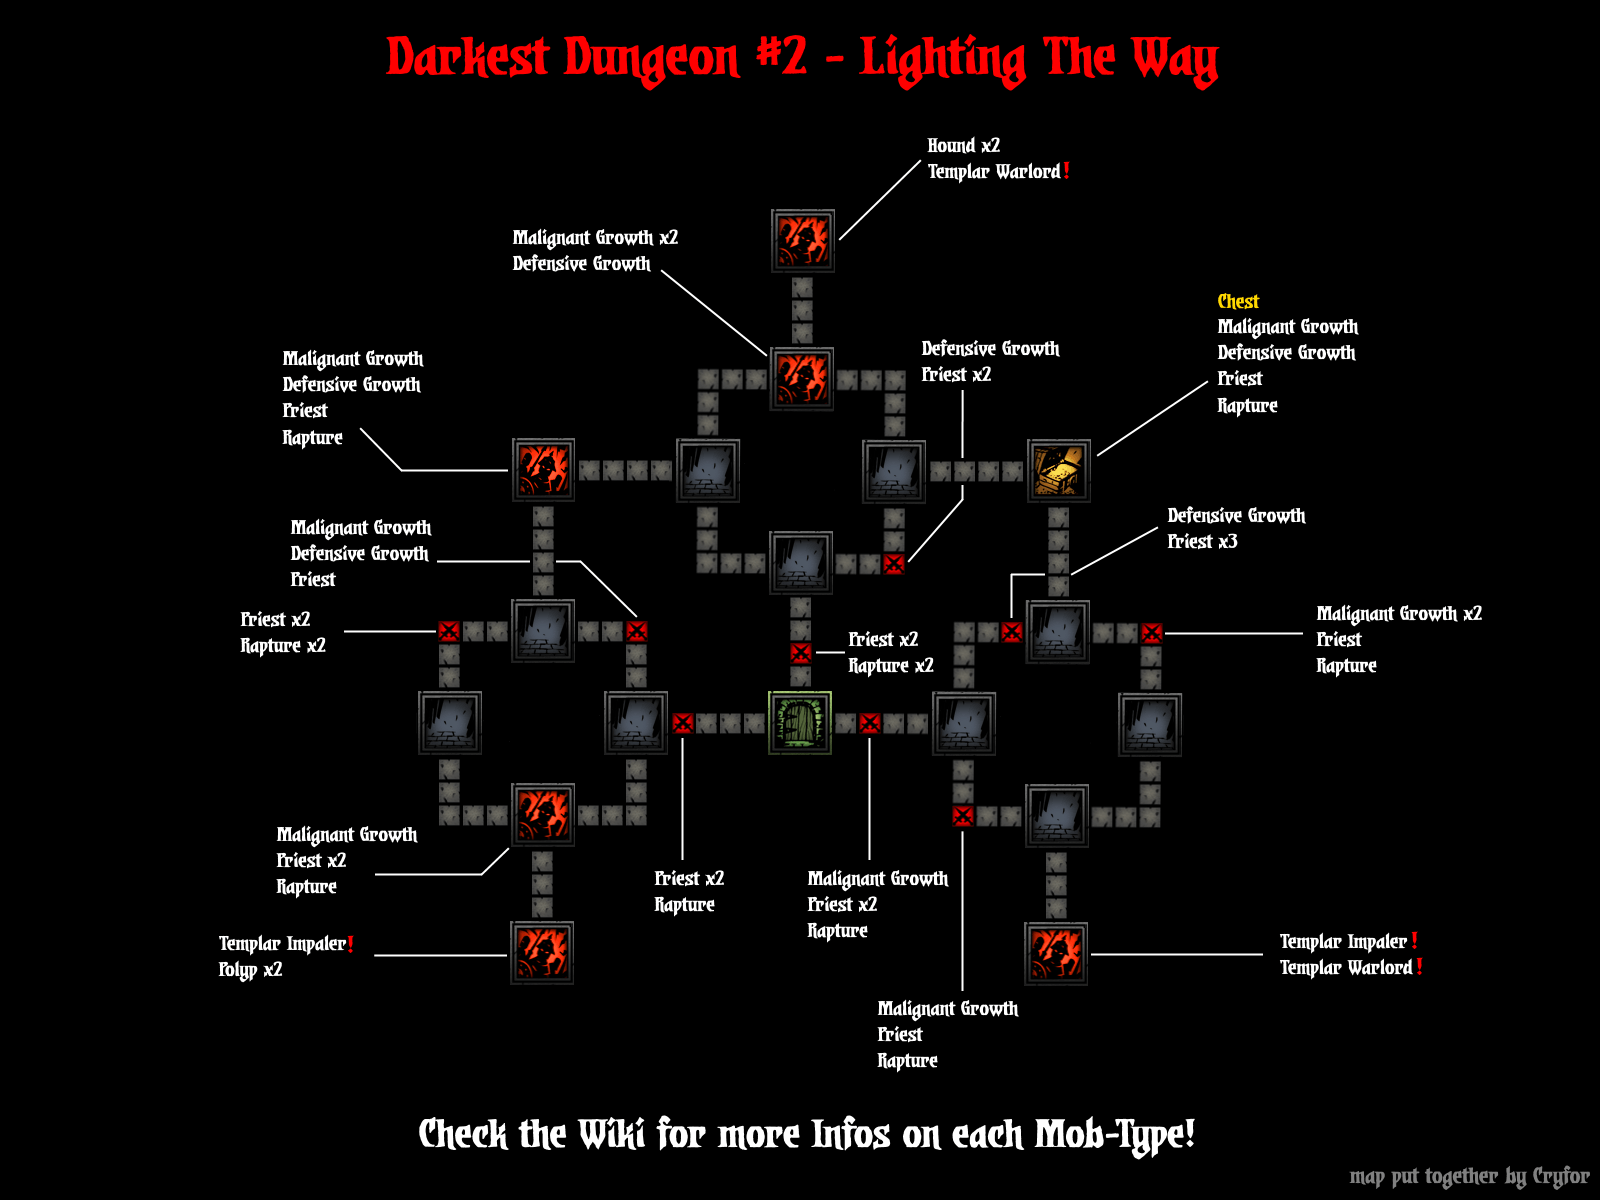 |
Belly of the Beast
- Size: Exhausting (4 campfires)
- Difficulty: Darkest
- Goals: Activate 1 Locus Beacon
This mission isn't hard so much as it is long — the dungeon is huge, and it's designed to grind you down over time. On top of that, the amount of firewood and food you'll need will cut into your other purchases — you're going to be short on something no matter what. If you wish to save space that would be taken up by food, equip all four of your party members with Fasting Seals, which makes it so none of your party members need to eat. Keep in mind that blight is much more of a threat in this level than bleed.
Most of the enemies are dangerous but unremarkable. You may run into a Templar or two, but don't panic — these ones are a lot weaker, lacking the Revelation ability and having only one action per turn.
The level's main gimmick is the Mammoth Cyst and White Cell Stalk combo. The Cyst doesn't do too much damage (at least by the standards of what you've already faced), but it has a lot of health, and can apply debuffs and blight. The Stalk, however, has a truly nasty ability — a Teleport ability which sends you to a random room on the edges of the map. The Stalk won't immediately teleport you on the first turn of the battle, but the likelihood of it using that skill increases over time. Although the fight won't reset if you make your way back, it still takes a lot of time and resources to deal with. Be warned: if you're teleported to a room you haven't explored yet, you will be unable to retreat from the fight inside.
Your party has to get to the center of the map (right and down from the starting location), where the Locus Beacon is guarded by one final Mammoth Cyst. If you get teleported, just fight your way back to the center while avoiding other Cysts. Use your camps whenever your health or stress become a problem. When fighting the Cysts and Stalks, priority goes to being able to kill the Stalks as quickly as possible while slowly chipping away at the Mammoth Cyst's health.
The Plague Doctor, FlagellantCrimson Court and Hellion are excellent choices here — the Doctor can cure DOT and help conserve antivenom, while both Hellion and Flagellant can hit the back rank hard in order to get rid of the Stalks before they have a chance to teleport your party. The Houndmaster also excels in this mission, as he has a damage bonus against the numerous Beast-type enemies in this mission. Be sure to account for his Dog Treats taking up inventory space, though.
Recommended classes: Abomination, Arbalest, FlagellantCrimson Court, Hellion, Houndmaster, Leper, Occultist, Plague Doctor, Vestal.
| DD3 Map layout with enemies and curios (spoilers) |
|---|
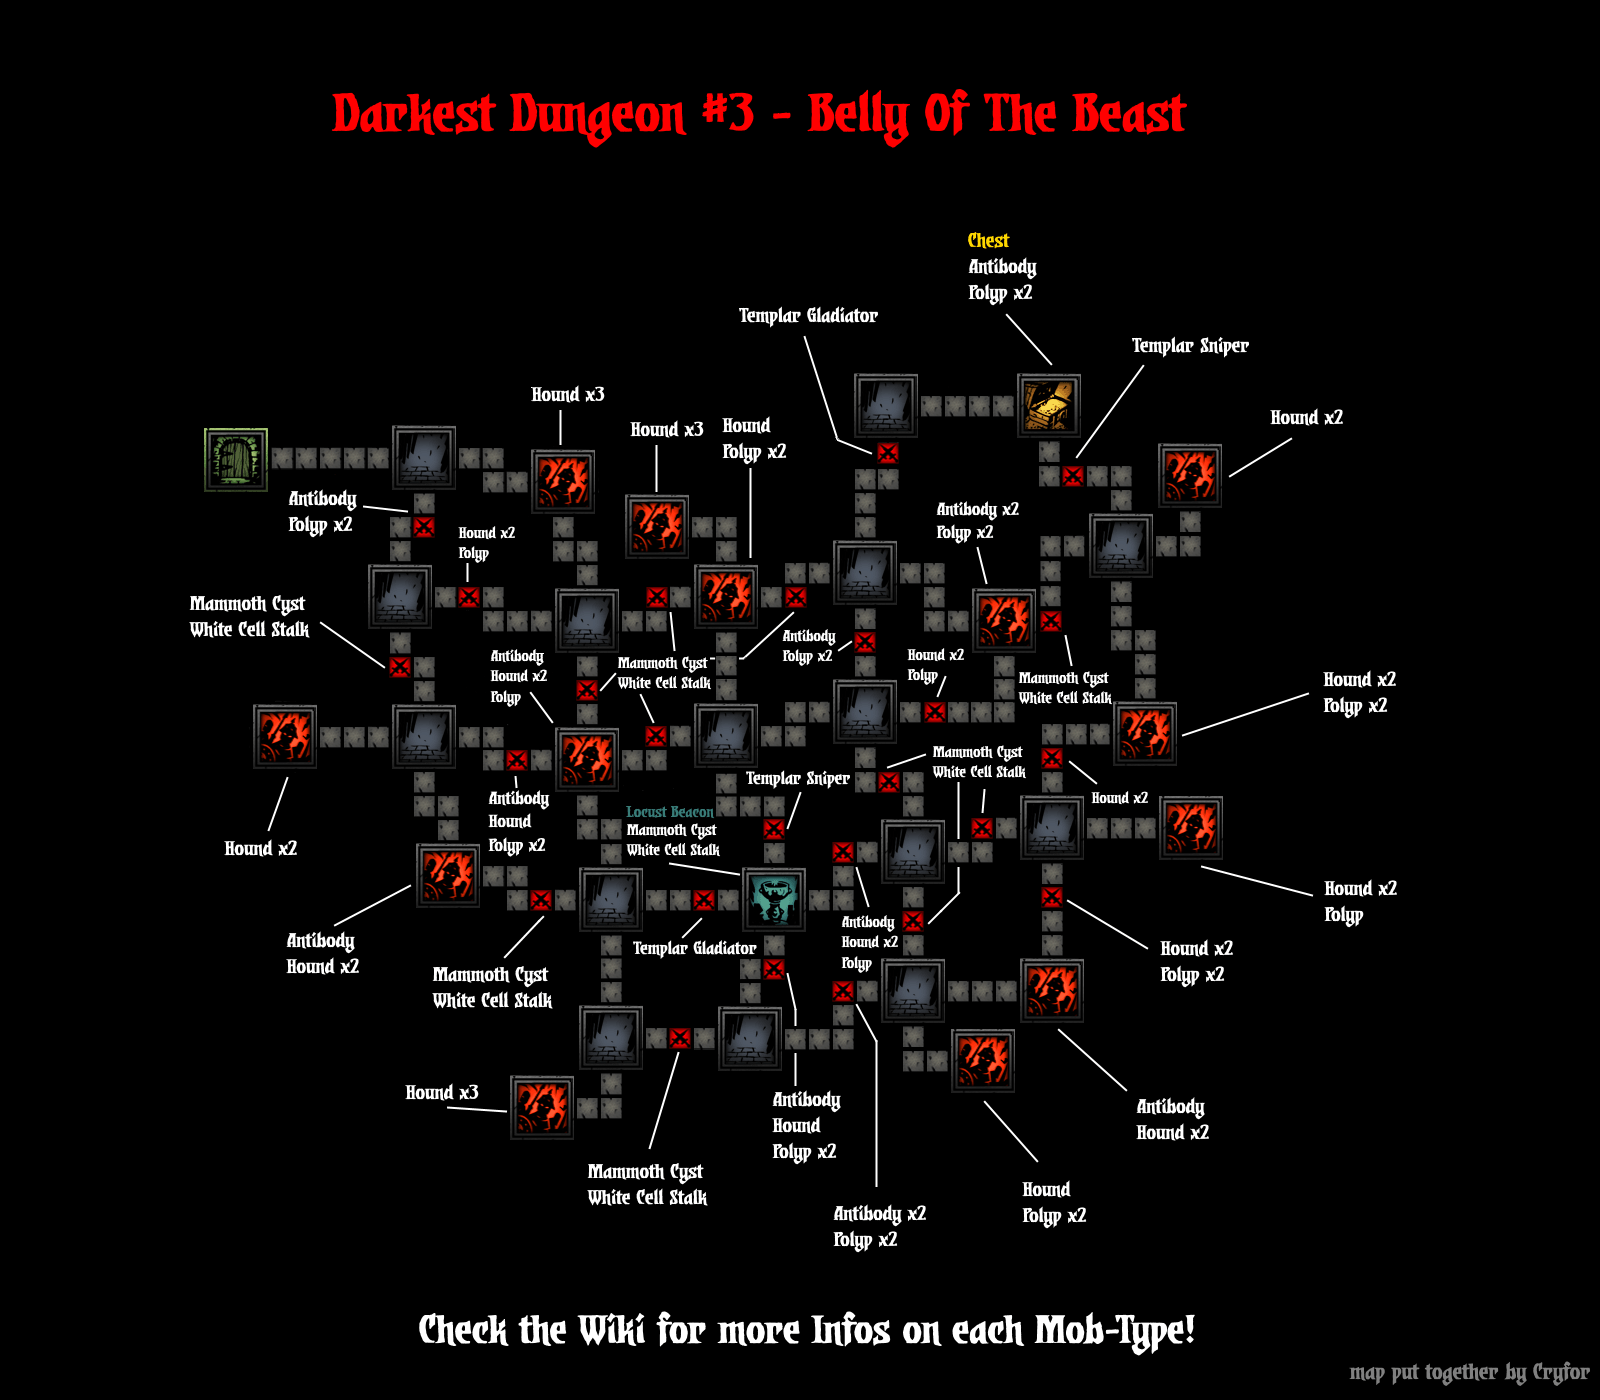 |
This article or section may contain spoilers about the final boss. You might want to avoid reading further if you don't want to spoil the surprise for yourself!