| Apprentice Level | |||||||||
|---|---|---|---|---|---|---|---|---|---|
| Skill Name | Range | Rank | Target | Accuracy | Crit Chance | Damage | Effect (Target) | Effect (Self) | Notes |
| All Hands on Deck! | Melee | 1, 2, 3, 4. | 2, 3, 4. | 102.5% | 0% | 0 | Summon 1 Drowned Puller | No Effect | |
| Mutiny | Ranged | 1, 2, 3, 4. | 2, 3, 4. | 82.5% | 0% | 1 | No Effect | ||
| Drink with the Dead | Ranged | 1, 2, 3, 4. | 2, 3, 4. | 82.5% | 0% | 1 | Stress +10 | No Effect | |
| Boarding Clutch | Ranged | 1, 2, 3, 4. | 1, 2, 3, 4. | 82.5% | 2% | 3-7 | No Effect | ||
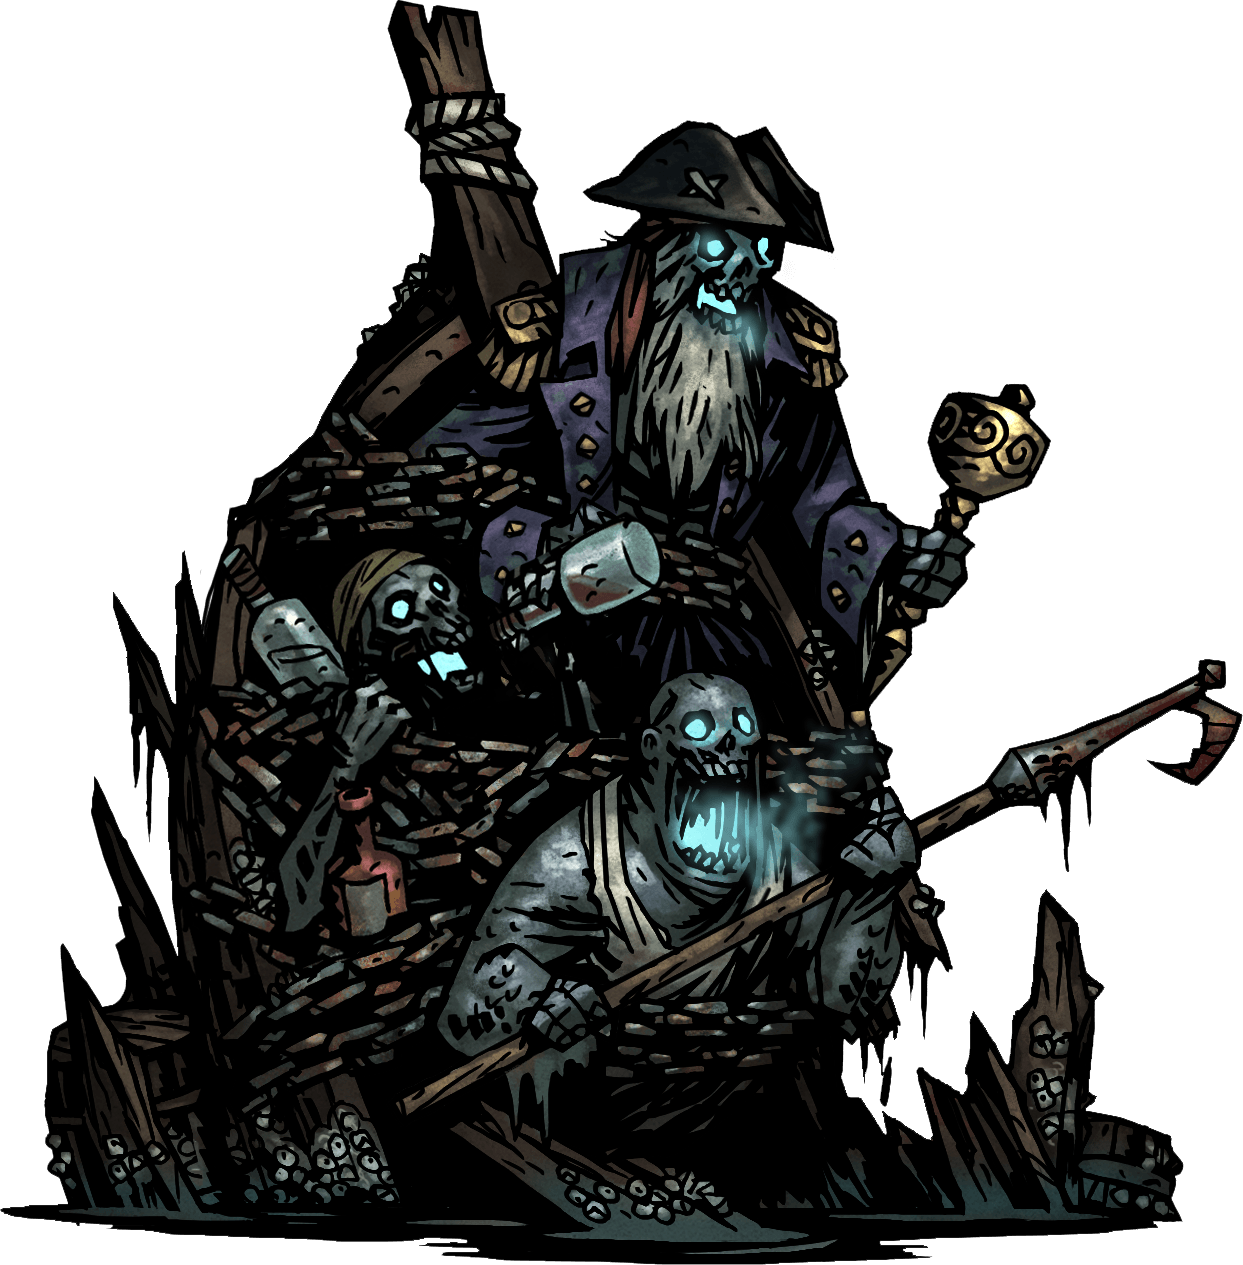
Cove · dungeon
Drowned Crew
TODO (md143rbh7f): we should probably merge the anchorman page into this one
Resistances
| Variant | Stun | Blight | Bleed | Debuff | Move |
|---|---|---|---|---|---|
| Sodden Crew | 50% | 20% | 60% | 20% | 200% |
| Sunken Crew | 70% | 40% | 80% | 40% | 220% |
| Drowned Crew | 95% | 65% | 105% | 65% | 245% |
Immune ≥100% Resistant 60–99% Normal 30–59% Vulnerable <30%
Stats by difficulty
| Stat | Sodden Crew | Sunken Crew | Drowned Crew | D |
|---|---|---|---|---|
| HP | 100 | 150 | 205 | 120 |
| Dodge | 0% | 8.75% | 22.5% | — |
| Protection | 0% | 0% | 0% | — |
| Speed | 3 | 4 | 5 | — |
Trinket drops All trinkets →
Recommended comps
Team recommendations
Behavior
Although they may appear to be individuals, the Crew are mechanically a single-target entity filling three ranks. The Drowned Anchorman is not part of the larger group and has his own HP, resistances, and set of abilities.
The Crew will start each round with "All Hands On Deck!", a free action which moves a hero to rank 1 and summons the Drowned Anchorman. The Anchorman can only use a single move, Heave to!, attempting to anchor the hero in rank 1.
An anchored hero is free to attack but is immobilised: they cannot move or be moved from rank 1. Furthermore, whenever anyone takes an action while a hero is anchored, the anchored hero will suffer 6 Stress while the Crew will heal 2.5%/3%/3.5% of their max health, making it fairly difficult to damage the Crew while someone is anchored.
An anchored hero will be released when their stress reaches 100 or 200, or when the Anchorman (or Crew) is killed. If the party retreats while a hero is anchored, the anchored hero will not retreat with them and will die instead.
Heave to! can fail to anchor a hero: the attack can be dodged, and Virtuous heroes will refuse to be anchored by "Heave to!", instead stress healing the rest of the party.
When summoned, the Anchorman has a buff that grants him +50% to PROT, Bleed Resist, and Blight Resist, as well as and +25% ![]() Stun Resist. Successfully anchoring a hero will cause the Anchorman to transfer these buffs to the Crew, and the buff is only removed when the anchored hero is released (or the Anchorman is killed, thereby releasing them).
Stun Resist. Successfully anchoring a hero will cause the Anchorman to transfer these buffs to the Crew, and the buff is only removed when the anchored hero is released (or the Anchorman is killed, thereby releasing them).
Successfully anchoring a hero will also fully heal the Anchorman, so any damage previously dealt will be wasted.
While a hero is anchored, the Anchorman will not take any actions, making him effectively immune to ![]() Blight and
Blight and ![]() Bleed. Blight and bleed can still damage (and kill) him, however, if applied before the Anchorman uses "Heave to!".
Bleed. Blight and bleed can still damage (and kill) him, however, if applied before the Anchorman uses "Heave to!".
The Crew will not use "All Hands on Deck!" if a hero is anchored.
Strategy
The Crew themselves are not too threatening, with low DODGE, low ![]() Blight resist, no PROT, and low-damage attacks. Since they takes up three ranks, every hero is able to target them in some way. The main threat in the fight comes from the Anchorman, since being anchored continuously deals stress to a hero and heals the Crew, making it extremely difficult to damage them. Ideally a party should have:
Blight resist, no PROT, and low-damage attacks. Since they takes up three ranks, every hero is able to target them in some way. The main threat in the fight comes from the Anchorman, since being anchored continuously deals stress to a hero and heals the Crew, making it extremely difficult to damage them. Ideally a party should have:
- A fast damage dealer who can burst down rank 1. The Anchorman is very slow and will likely act last, after the rest of the party. A fast damage dealer can then kill the Anchorman at the beginning of the next round, before too many turns elapse.
- Rank-flexibility. The Crew will constantly pull heroes to rank 1, disrupting the entire party's positioning.
One powerful strategy is to ![]() Stun the Anchorman before it uses "Heave to!", as this allows the team to ignore him for one round and focus on damaging the Crew. Note that the Anchorman's buff gives him very high
Stun the Anchorman before it uses "Heave to!", as this allows the team to ignore him for one round and focus on damaging the Crew. Note that the Anchorman's buff gives him very high ![]() resistance (95% on Champion), so stunners must be equipped with strong
resistance (95% on Champion), so stunners must be equipped with strong ![]() chance trinkets to be effective against him. Note additionally that if a hero is already anchored, stunning the Anchorman will not release the anchored hero.
chance trinkets to be effective against him. Note additionally that if a hero is already anchored, stunning the Anchorman will not release the anchored hero.
If the party manages to control the Anchorman by stunning him before he acts, or killing him quickly afterwards, then his threat is largely mitigated. This allows the party to focus the rest of their attacks on the Crew, which should die quickly.
An alternative strategy is to invest heavily in DODGE since Heave to! can be dodged. With this strategy, a high-DODGE hero will try to make sure that they are always in position 1. With enough DODGE, Heave to! will very rarely hit, negating the Crew's most powerful mechanic and trivialising the fight.
While it is possible in theory to block "Heave to!" with Virtues, this approach is not recommended as it is highly inconsistent. Even at max virtue chance a hero is not guaranteed to become Virtuous, and even if they do become Virtuous, the Crew are likely to pull other heroes to the front.
Reasonable Choices
- Arbalest - Very strong Mark synergy. However, she is very weak to being repositioned.
- Hellion - Can deal very good damage but relies on being in the front ranks and cannot reposition herself efficiently.
- Leper - As with the others, can deal massive damage but is vulnerable to being repositioned. In theory he can burst down the Anchorman with his high damage, but his slow speed means that several turns will have elapsed, healing the Crew and inflicting stress on him.
Discouraged Heroes
- Flagellant - Cove enemies, including the Crew and Anchorman, are resistant to
 Bleed.
 - Vestal - Her
 Stun is fairly weak and she becomes largely useless when Pulled.
Abilities
| Veteran Level | |||||||||
|---|---|---|---|---|---|---|---|---|---|
| Skill Name | Range | Rank | Target | Accuracy | Crit Chance | Damage | Effect (Target) | Effect (Self) | Notes |
| All Hands on Deck! | Melee | 1, 2, 3, 4. | 2, 3, 4. | 108.75% | 0% | 0 | Summon 1 Drowned Roperman | No Effect | |
| Mutiny | Ranged | 1, 2, 3, 4. | 2, 3, 4. | 88.75% | 0% | 1-2 | No Effect | ||
| Drink with the Dead | Ranged | 1, 2, 3, 4. | 2, 3, 4. | 88.75% | 0% | 1-2 | Stress +10 | No Effect | |
| Boarding Clutch | Ranged | 1, 2, 3, 4. | 1, 2, 3, 4. | 88.75% | 6% | 4-9 | No Effect | ||
| Champion Level | |||||||||
|---|---|---|---|---|---|---|---|---|---|
| Skill Name | Range | Rank | Target | Accuracy | Crit Chance | Damage | Effect (Target) | Effect (Self) | Notes |
| All Hands on Deck! | Melee | 1, 2, 3, 4. | 2, 3, 4. | 122.5% | 0% | 0 | Summon 1 Drowned Anchorman | No Effect | |
| Mutiny | Ranged | 1, 2, 3, 4. | 2, 3, 4. | 102.5% | 0% | 1-3 | No Effect | ||
| Drink with the Dead | Ranged | 1, 2, 3, 4. | 2, 3, 4. | 102.5% | 0% | 1-3 | Stress +10 | No Effect | |
| Boarding Clutch | Ranged | 1, 2, 3, 4. | 1, 2, 3, 4. | 102.5% | 7% | 7-13 | No Effect | ||
Trophy
After completing the Drowned Crew's champion quest, the captain will drop his bell as a Trophy.
| Image | Name | Rarity | Dungeon | Effect | Notes |
|---|---|---|---|---|---|
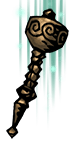 | Crew's Bell | Trophy | Cove |
| Quest reward for "Kill the Drowned Crew." |