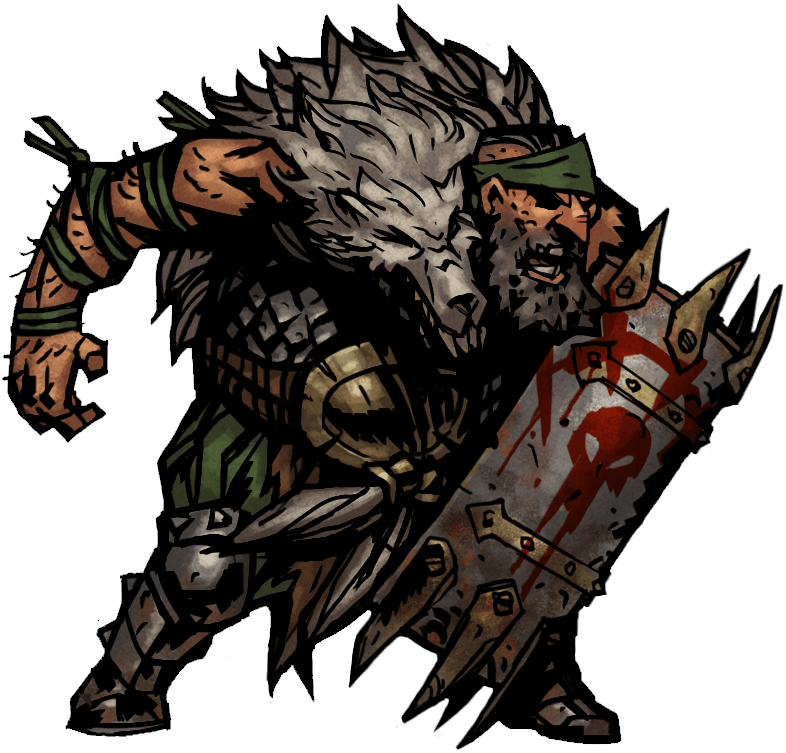
Brigand Vvulf
Vvulf is a leader of the Human brigands in the area surrounding the Hamlet, and he may be encountered during the unique town event Wolves at the Door.
Resistances
| Variant | Stun | Blight | Bleed | Debuff | Move |
|---|---|---|---|---|---|
| A | 100% | 75% | 75% | 60% | 300% |
Stats by difficulty
| Stat | A | B |
|---|---|---|
| HP | 160 | 240 |
| Dodge | 20% (25% [[Game Modes#Features of Stygian Mode | — |
| Protection | 0% | — |
| Speed | 4 | — |
Recommended comps
Team recommendations
Behavior
Armed with a Tower Shield and a barrel full of bombs, Vvulf is able to deal massive damage and guard his men from attacks. He may also call in other Brigand reinforcements.
If the Barrel O' Bombs is out, he will start every round with "Bombs Away," placing a bomb on a rank like the Prophet's Calamitous Prognostication. At the end of the round, he will use "Time's Up!" which detonates the bomb, dealing heavy damage to the hero on the same rank. Both of these skills are automatic and don't use up his turns.
Destroying the Barrel at any point prior to "Time's Up!" will automatically cancel active bombs, i.e., they will do no damage, making the removal of the Barrel a priority every turn, similar to the Matchmen in the Brigand Pounder boss fight. However, the Barrel O' Bombs also has a persistent Riposte effect, meaning it will automatically counter-attack any non-lethal damage it takes.
Vvulf can subsequently re-summon the Barrel using the ability "Get Them!" if it has been destroyed. Vvulf will use this ability every turn that there is no active Barrel O' Bombs. "Get Them!" will also summon Brigand Cutthroat class enemies, and has a chance of stunning one hero.
His other skills are "Tower Shield," a skill that guards one of his allies and has a high chance of summoning another Brigand Raider, and "Warcry" which causes stress damage on one or two heroes.
Strategy
The Vvulf is not like a regular boss, requiring several distinct considerations.
- Firstly, be aware that abandoning the quest for Vvulf will result in a party member dying, unlike most boss fights. This means you shouldn't come after Vvulf unless you're confident of success. If unprepared, it may be better to just allow him to damage your hamlet, as opposed to risking heroes in the quest. Alternatively, you could send a lone hero in to simply die for the greater good, which will cancel the quest without allowing Vvulf to harm your town.
- Since this is a "Short"-length quest, there is no option to use Camping Skills.
- The dungeon is non-random and always appears with the same layout, unlike most quest dungeons in the game. His room is thus always predictable. While the dungeon is small, it has numerous fights before you can reach the boss.
- There are also 2 side wings which can contain Ancestor's trinkets, but pursuing these means enduring more fights. It may be best to go for these after the fight with Vvulf, if the party is still battle worthy.
Vvulf only occupies 1 slot, has 2 turns per round, and is only slightly more vulnerable to blights than bleeds (5% difference). He does have a fair amount of Dodge, so buff your Accuracy, but has no PROT for when strikes do connect. He's prone to moving throughout the fight, but will usually be at slots 2 or 3. He also has a "Barrel of Bombs" that has a permanent Riposte. Due to this riposte, it might be more ideal to leave it alone, as opposed to destroying it; he'll always quickly replace it anyway.
The biggest danger of Vvulf is actually the quest itself. By the time you reach him, you're bound to be worn out, and there's no option for Camping skills to help. Carry max bandages to remove the constant bleeds which brigands will apply in this dungeon, extra food to heal out of combat, and be prepared for the Stress as well. Carrying enough shovels is also important. Since bleeds work fine here, bringing the Jester or Houndmaster is not a bad choice.
This fight is very similar to the Prophet. He will drop a bomb on one of your party's slots, then at the end of his turn, set it off. However, it'll only ever be 1 slot, making it easier to counter. Simply bring the Man At Arms and guard whoever has the bomb. Bringing a Houndmaster does NOT work, however, since the Explosions ignore Dodge. This removes Houndmaster's main way of defense, which makes him worse at Guarding Bombs than Man At Arms. If you have the Shieldbreaker DLC and have Aegis Scales in stock, you can also use those to defend against a bomb. Destroying the barrel of bombs will cancel the bomb on your party (somehow), but Vvulf will just summon a new one, then promptly throw a new bomb. If you want to try destroying the barrel, only use hard hitting attacks to try to quickly destroy it because each one will trigger a riposte.
Vvulf himself does little, relying on his bombs and minions to do most of the work. He also likes to Guard his own minions, which just works in your favor as it makes him an easier target without applying any buffs to compensate. If he's in slot 3 for example, the Leper can still hit him simply by targeting a minion with guard.
Preferred Heroes
- Arbalest - Very high Health for a backliner who can tank any non-crit Bomb and deal great damage, especially when Vvulf is marked.
- Bounty Hunter - Bonus damage against a majority of the threats in this mission and can deal vast amounts of burst with Mark on Vvulf.
- Crusader - Can deal good amounts of damage and take lots of hits. His heals can come in clutch late into initiative to get someone off of Death's Door after the two Raiders have attacked. His low SPD can also be a disatvantage due to him going late into the round.
- Flagellant - Can deal better damage since he gets more Bleed ticks due to Vvulf's two actions. His healing is very effective since Reclaim can be used to prevent Death by Bleed from the Raiders and preemtively heal Bomb targets. Redeem and Exsanguinate can both swing the fight in the hero's favor by either healing a large amount or dealing a huge burst of damage.
- Hellion - Deals great damage to any rank and can take quite a few hits. When Vvulf Guards Rank 1, she can use Bleed Out to finish the fight with a huge burst of damage.
- Leper - Very high frontline damage can tear through the Bandits he summons. Even if Vvulf moves to the backlines, the Bandits he guards can allow him to strike Vvulf anyway. His high Health also allows him to survive for a long time without needing any attention from supports.
- Occultist - His debuffs can take a lot of bite out of the bombs, can undo Bomb damage with a highroll heal, even Stun Vvulf and he provides Mark synergy with a Bounty Hunter.
Reasonable Choices
- Abomination - Can recover Stress very well throughout the mission with Absolution. He can deal good amounts of burst against Vvulf for 3 turns until his Transform damage increase expires, since Vvulf can't escape Rage's reach.
- Grave Robber - Can deal great damage by using Lunge multiple times, but can die just as fast due to low Health.
- Highwayman - Duelist's Advance provides extra damage against a lot of incoming attacks from the Raiders, but he can't deal any exceptional damage to Vvulf since most of his actions don't trigger Riposte or Stun the Highwayman, disabling Riposte until the Stun is cleared.
- Houndmaster - "Cry Havoc!" can provide good Stress relief during the course of the quest. His Guard skill, however, is not as useful due to the bomb ignoring Dodge. Still the best replacement for a Man-at-Arms, but he will need a lot more healing and PROT Trinkets, which makes him worse for the prior fights.
- Jester - Party buffs will be helpful for the fight, and he's also capable of relieving the high amounts of Stress going about, but he can die very quickly to one or two unlucky Raider Hits though.
- Plague Doctor - Very low health can make her a risk for the fight, but her Blights can make quick work of Vvulf if they land.
- Shieldbreaker - Can use Serpent Sway to add Blocks to keep her going, but can die to the Raider's fairly easily due to low defenses. Her damage is very high since she can use Adder's Kiss to deal both good damage and apply Blight to Vvulf on a Guarded Raider.
- Vestal - Her healing can keep the party and especially the Guarder alive. She doesn't provide much on the offensive end however, so building your team correctly is key to make her work well.
Discouraged Heroes
- Antiquarian - There isn't a lot of loot to be found in the quest's tiny map. Her Dodge buff doesn't help against the bombs since they ignore Dodge and Protect me can't serve as a sole Guard in this fight. Her offensive capabilities are also quite low.
Abilities
| Darkest Level | |||||||||
|---|---|---|---|---|---|---|---|---|---|
| Skill Name | Range | Rank | Target | Accuracy | Crit Chance | Damage | Effect (Target) | Effect (Self) | Notes |
| Bombs Away | Ranged | 1, 2, 3, 4. | 1, 2, 3, 4. | 112.5% | 0% | 0 | Rank Mark* | No Effect | |
| Time's Up! | Ranged | 1, 2, 3, 4. | 1, 2, 3, 4, 100% +1 Target.** | 222.5% | 10% | 23-45 | Clear Rank Mark* | No Effect | |
| Get Them!*** | Melee | 1, 2, 3. | 1, 2, 3, 4. | 112.5% | 10% | 2-5 | Summon 1 Barrel O' Bombs Summon 1 Brigand Raider 33% Summon 2nd Brigand Raider | No Effect | |
| Tower Shield | Support | 1, 2, 3. | 1, 2, 3, 4 (allies). | 75% Summon 1 Brigand Raider | No Effect | ||||
| Warcry | Ranged | 1, 2, 3. | 1, 2, 3, 4, 100% +1 Target. | 112.5% | 0% | 0 | Stress +8 | No Effect | |
Trophy
After completing the quest, Vvulf will drop his tassle as a Trophy.
| Image | Name | Rarity | Dungeon | Effect | Notes |
|---|---|---|---|---|---|
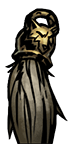 | Vvulf's Tassle | Trophy | Hamlet |
| Quest reward for "Wolves at the Door." The CRIT buff applies for any enemy that is size 2 and above. |